 |
| Essie's Over the Edge (a dramatic metallic midnight silver) |
Showing posts with label beauty. Show all posts
Showing posts with label beauty. Show all posts
Wednesday, December 5, 2012
Tuesday, December 4, 2012
Nails of the Day: Rose Shimmer Gradient Nails
 |
| Essie's A Cut Above and Muchi, Muchi |

 |
| How To- I applied 4 coats (eek!) of muchi, muchi to my nails, allowing them to dry completely between coats. Taking A Cut Above, apply a thin coat to your entire nail and let dry. Starting in the middle of your nail, apply another coat of the luxeffect. Wait at least 10 minutes until your polish is completely dry and finish off the gradient with another layer of A Cut Above on the tips of your nails. Ta-Da! |
Monday, December 3, 2012
Nails of the Day: Nude Shimmery French Manicure (Inspired by Shay Mitchell)

 |
| Shay's Nails |
 |
| My Finished Product |
 |
| Essie's Beyond Cozy and Sand Tropez |
 |
| How To- After allowing 3 coats of Sand Tropez to dry, apply 2 coats of Beyond Cozy with a light hand along the curve of each nail. If you find it difficult to get this neat enough (especially when using your non-dominant hand) reinforcers applied to dry nails make for an excellent guide. Last Valentine's Day I made a Youtube video demonstrating this technique. UPDATE!: I tweeted this post to Shay on twitter and she actually responded! I was soo excited, it made my day! Thanks Shay! 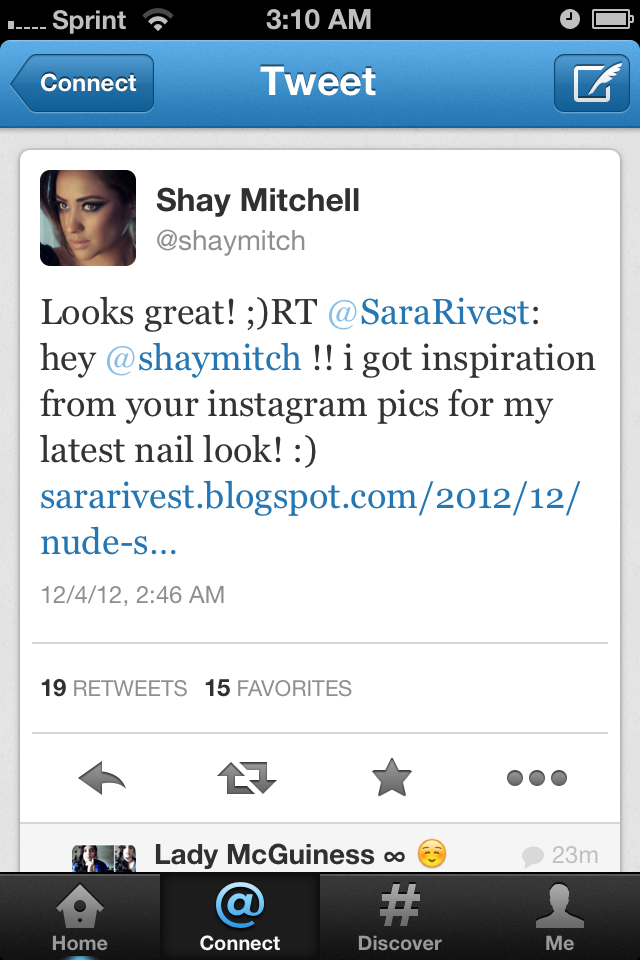 |
Sunday, December 2, 2012
Review: Essie's Repstyle Magnetics
I just came back from Target where I was so excited to see that Essie finally came out with their own magnetic nail collection! A lot of other brands have magnetic products but this was my first experience with them. I liked how Essie's looked like they had a sort of quilted effect which is different than the other ones I've seen.
I purchased 4 of the 6 colors. First I'll get into the individual color reviews and at the end I'll give my overall review on the product and what I think of the application and all that jazz.

This metallic, shimmery red is a really gorgeous color for winter time. The finish is very shiny and perfect if you are looking for a little twist to a classic color.

What do you guys think? Have you tried these or any other magnetic nail polishes?
I purchased 4 of the 6 colors. First I'll get into the individual color reviews and at the end I'll give my overall review on the product and what I think of the application and all that jazz.

From L to R: sssssexy, crocadilly, snake it up, and lil' boa peep
 |
| sssssexy "a striking, scintillating sanguine" |
 |
| crocadilly "a croc hunter green" Out of the four I tried, I'd say this one is the most dramatic. The contrast between the two colors is the most striking. |
 |
| snake it up "a pewter pavé python" One of my favorites out of the bunch, I'd say this one is the most subtle. It's definitely blue but has some purple metallic sheen to it. |
 |
| lil' boa peep "copperhead titanium" This is a gorgeous copper, champagne shade with a great metallic sheen. Again, great for the holidays. |

(Not all Target stores have this collection but on their website you can double check and see which nearby Target carries them.)
Review: So as I said earlier this is my first time trying magnetic polishes, keep that in mind while reading my review since I do not have anything to compare them to. I'll start by saying I think these are an excellent way to add some texture to your nails and create some visual interest that's different from anything I've seen. Usually when I see the magnetic polishes I find that the shapes they create are kind of strange but I love that these one's create a sort of "quilted" effect. The colors all looked gorgeous after one coat and I could have easily use them all on their own without the magnet and still have been satisfied.
The polish dried really quickly and the first coat went on really evenly and smoothly. The colors are opaque and 2 coats is all you need for the desired look. As it says in the instructions (listed below) you are supposed to hold the magnet in place and as close as possible for 5 seconds. Although the effect is really cool, it was not applied to my entire nail, just the top. The sides were still the plain color which is ok but not what I was expecting. When I tired to then apply the magnetic effect to the sides of my nails it wouldn't work since the polish was already beginning to dry, kind of a let down in that respect. Each nail I tried to go faster so that I could get the entire nail but it never quite worked like it was supposed to.
Regardless, as long as you aren't expecting your entire nail to be the snakeskin effect, I think they are a really cool way to switch up your nails!
 |
Instructions: Start by applying 1 coat of the Essie base coat that best suits your nail needs. Then apply one coat of Essie Snakeskin Magnetic Polish. For the second coat of polish, paint one nail at a time. Immediately after polishing each nail, hold the magnet over wet polish (as close as possible without touching) for 5 seconds to reveal the snakeskin design. Seal the deal by applying one coat of your favorite Essie top coat.
What do you guys think? Have you tried these or any other magnetic nail polishes?
Wednesday, November 14, 2012
Room Make Over
Saturday night I randomly decided it was time for a change... went out and bought some paint and redid my room!


Tuesday, November 13, 2012
Nails of the Day: Red and Champagne Winter Nails
I'm totally obsessing over my new nail polishes! These are two of my favorites from Essie's Winter 2012 Collection.... The champagne polish on my ring fingers is Beyond Cozy and the gorgeous shimmery red is called Leading Lady. Both are SUPER shimmery and absolutely perfect for the upcoming season.

(I know my nails are a mess but I was just really excited!)
Also on my nails are the Kiss Full Cover Artificial Nails.. this was my first time applying fake nails in probably five years and they were super easy to use. These ones come in a pack of 100 so you're bound to find ones that'll fit your fingers. It's definitely a cool way to change up your nails especially if you're having a hard time growing out your nails.
Sunday, November 4, 2012
Nails of the Day: Nude and Sparkle
If you've seen my latest haul, you probably noticed I have issues, mainly my strange compulsion to change my nail polish multiple times a day. I've mastered the art of changing polishes no matter where I am.. I think it's such a fun way to change up your look and boost your mood. Since I posted that haul, I've picked up a few new colors and this unexpected combo has become my favorite.

Sand Tropez and Set in Stones both by ESSIE
Sunday, August 26, 2012
Subtle Smokey Eye using Naked 2 Palette!
Surprisingly I've never really been into wearing a lot of eye makeup. I usually end up spending 10 minutes trying to create a pretty look and then end up feeling self conscious about it and removing it right before I walk out the door. I can honestly say I do not have that problem anymore after purchasing my Naked 2 palette (Urban Decay.) Here's a quick video I made on one of my favorites looks to do with the palette!!


Here's some celebrity looks that can be achieved using this palette-


Monday, April 30, 2012
BIG Beautiiiful Lips!
A few weeks ago a made a tutorial showing you guys how to make my favorite DIY lip scrub... not only does that scrub prep your lips for any product you choose (gloss, lipstick, pencil, etc.) it also makes them look BIGGG!
Continuing on with the bigger is better theme when it comes to your lips.. today I put together a tutorial demonstrating how to accentuate your pretty pout and make it stand out!
Here's the steps!!
1. Using a white eye pencil (Jessie's Girl, Walmart, $1) draw a line following along your cupids bow.
2. Blend that in with a brush or your finger.
3. Apply a bright pink lipstick pencil (Sephora "Strawberry Delish" $14) focusing on the edges.
4. Apply a lighter pink color (NARS "Roman Holiday" $24) to the center of your top and bottom lips.
5. Finish off with a plumping gloss (Soap and Glory SexyMotherpucker in Peachy Pink, $10) for extra plumpness and to blend everything together!
What do you guys think? Do you like big, statement lips or do you think its too crazy?!
ps... if you like my braid, check out this video :)
Tuesday, March 27, 2012

DIY: Leather Bow Bracelets
Bows are the perfect girly accessory. Mix in a fabric like leather (faux of course) and you've got the perfect mix of sweet and edgy. I've always loved bows and these DIY leather bow bracelets are the perfect accessory for spring.
Subscribe to:
Posts (Atom)